
Introduction
Your OutSystems app works great, but you need to extend it with an external dashboard — and you don’t want users to log in twice. JWT authentication in OutSystems solves this exact problem. OutSystems mints a short-lived signed token, your external app validates it locally, and the user lands authenticated on the other side.
This guide walks you through every step of the pattern. It covers the concepts, the code, and the real bugs that cost me time during my proof-of-concept. The example uses .NET 8 and React, but the pattern works with any stack.
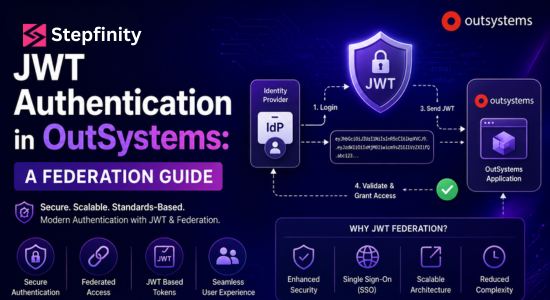
[Insert hero diagram showing OutSystems → JWT → External App handoff flow]

What Is a JWT Handoff?
A JWT handoff is a federation pattern where one trusted system issues a cryptographically signed token, and another system validates it locally. OutSystems plays the role of the issuer. Your external app plays the role of the validator. No callback fires between them. No second login appears. No shared database glues them together.
How Does the Flow Work?
The handoff completes in five steps:
- The user clicks a link inside OutSystems
- OutSystems generates a JWT containing the user’s identity
- The browser redirects to your external app with the token
- Your external app validates the signature and creates its own session
- The user lands on the external app, already authenticated
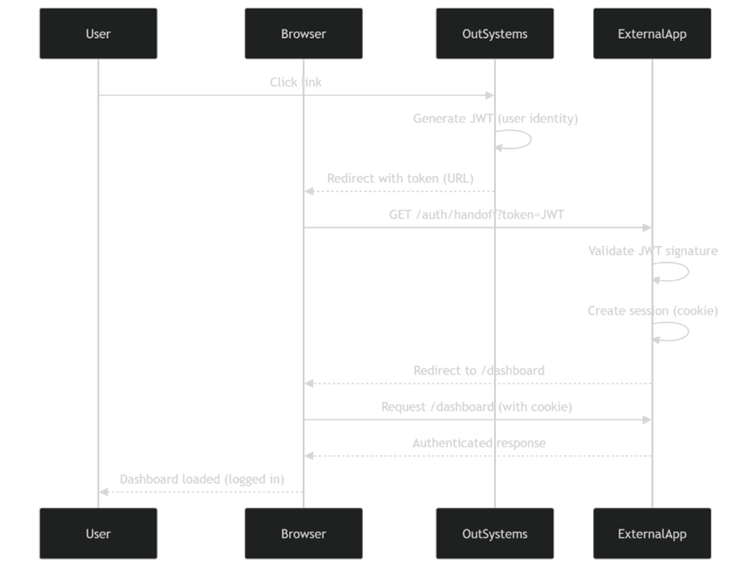
The external app accepts requests over HTTP. Anything that runs HTTP and can verify an RS256 signature works as the validator — Node.js, Java, Python, Go, .NET, Ruby. This guide demonstrates the pattern using .NET on the backend and React on the frontend, but the OutSystems side stays identical regardless of which stack receives the token.
Why Choose JWT Over Other Federation Methods?
Three options compete for this job. Each carries different trade-offs.
- Session cookie sharing forces both apps onto the same domain and tightly couples their auth lifecycles
- Full OAuth or OIDC delivers maximum power but demands weeks of setup and operational complexity
- JWT handoff lands in the sweet spot — secure, standard, and shippable in days
JWT handoff wins on four practical points:
- Stateless validation removes any roundtrip to OutSystems on every API call
- RS256 signatures plug into every major language ecosystem
- Short token lifetimes (60–120 seconds) shrink the replay window
- Stack-agnostic design lets you write the receiver in any language

How Does the Architecture Look?
The system splits into three layers. Each layer owns a single responsibility.
What Does OutSystems Handle?
OutSystems holds the user records and signs tokens. A Site Property stores the private RSA key. The setup looks identical regardless of which app consumes the tokens.
What Does the External Backend Handle?
The backend validates incoming JWTs using the public key, issues a session cookie, and exposes protected endpoints. In our example, an ASP.NET Core 8 minimal API does this work. Express, Spring Boot, or FastAPI would do the same job in different syntax.
What Does the Frontend Handle?
The frontend renders the user experience and reads the session cookie via credentials: ‘include’. Our React SPA queries /api/me to populate the auth context, then renders protected views.
[Insert architecture diagram showing the three layers and data flow]
The .NET backend serves the React app’s static files from wwwroot/. This setup runs one process on one origin — no CORS configuration appears anywhere.

How Do You Generate a JWT in OutSystems?
OutSystems lacks native JWT support, but the JWTUtils Forge component fills the gap cleanly.
Step 1: Install the JWTUtils Extension
Download JWTUtils from the OutSystems Forge and add it as a dependency in Service Studio. The component supports HS256, RS256, and other standard algorithms.
Step 2: Generate an RSA Key Pair
You need an RSA key pair. The private key signs tokens in OutSystems. The public key validates them in your external app. Two methods produce the keys you need.
Option A: Online Generator (Quick Test)
For local development or quick experimentation, browser-based generators produce a key pair in seconds:
Pick 2048 bits or higher, generate the pair, and copy both keys. The output already follows PEM format.
Security note: Online generators run in your browser, but you should never trust them for production keys. The generated material may persist in browser caches or other places you can’t control. Use them for prototypes and tests only.
Option B: OpenSSL (Recommended for Real Use)
For anything beyond a sandbox, OpenSSL generates the keys locally:
openssl genpkey -algorithm RSA -pkeyopt rsa_keygen_bits:2048 -out private.pem
openssl rsa -in private.pem -pubout -out public.pem
The keys never leave your machine. Place the private key in OutSystems as a Site Property. Place the public key in your external backend’s config. Never share the private key with anyone.
[Insert link to OpenSSL documentation]
Step 3: Build the CreateToken Server Action
Create a Server Action that calls CreateToken and passes these parameters:
- Issuer: “my-os-environment” — identifies your OS environment
- Subject: GetUserId() — the OS user’s numeric ID
- Audience: “my-external-app” — identifies the receiving app
- Expiration: AddSeconds(CurrDateTime(), 120) — short lifetime
- CustomClaims: name and email as NameValuePair entries
Pick names that fit your project. The strings only need to match between OutSystems and your external app.
[Insert screenshot of the OutSystems CreateToken action with all parameters]
Step 4: Build the Redirect URL
When the user clicks your “Open External App” button, OutSystems redirects them with the token attached:
“https://your-external-app.com/auth/handoff?token=” + CreateToken.EncodedToken
That covers the full OutSystems side. Five steps. Roughly thirty minutes of work.

How Do You Validate the JWT in the External App?
The external backend handles three jobs: it validates the token, creates a session, and protects the API. The example below uses C# and ASP.NET Core, but the same logic translates directly to any language with a JWT library.
Step 1: Configure the JWT Settings
Your config stores the public key and validation parameters. In .NET, appsettings.json holds them:
{
“Jwt”: {
“Issuer”: “outsystems-wiz-token”,
“Audience”: “wiz-react-app”,
“PublicKey”: “—–BEGIN PUBLIC KEY—–\n…\n—–END PUBLIC KEY—–”
}
}
The \n escapes matter. JSON forbids real newlines inside string values.
Step 2: Validate Tokens in the Handoff Endpoint
The endpoint receives the token, validates the signature, and signs the user in:
app.MapGet(“/auth/handoff”, async (HttpContext ctx, [FromQuery] string token) =>
{
var parameters = new TokenValidationParameters
{
ValidateIssuer = true,
ValidIssuer = expectedIssuer,
ValidateAudience = true,
ValidAudience = expectedAudience,
ValidateLifetime = true,
IssuerSigningKey = publicKey,
ValidAlgorithms = new[] { “RS256” }
};
var principal = handler.ValidateToken(token, parameters, out _);
// Extract claims, sign in with cookie, redirect
});
[Insert link to the official Microsoft.IdentityModel.Tokens documentation]
Other stacks follow the same pattern. Node.js uses jsonwebtoken. Python uses PyJWT. Java uses jjwt or Nimbus. The validation parameters mean the same thing across all libraries.
Step 3: Issue a Session Cookie
After validation succeeds, the backend creates an HttpOnly cookie containing the user’s claims:
await ctx.SignInAsync(
CookieAuthenticationDefaults.AuthenticationScheme,
userPrincipal,
new AuthenticationProperties
{
IsPersistent = true,
ExpiresUtc = DateTimeOffset.UtcNow.AddMinutes(30)
});
Make the cookie HttpOnly so JavaScript can’t access it. Set SameSite=Lax for safe browser defaults. Drive the session lifetime from config — the next section explains why.

What Three Gotchas Should You Watch For?
These three traps cost me real time during the build. Spotting them in advance saves you the same pain.
Gotcha 1: .NET Renames Standard JWT Claims
When JwtSecurityTokenHandler validates a token, it silently remaps standard claim names to legacy XML URLs:
- sub becomes http://schemas.xmlsoap.org/ws/2005/05/identity/claims/nameidentifier
- email becomes http://schemas.xmlsoap.org/ws/2005/05/identity/claims/emailaddress
So principal.FindFirst(“sub”) returns null even though the token clearly carries a sub claim. This trap belongs to .NET specifically, but other languages hide their own claim-handling quirks worth checking.
One line fixes it. Add this before any JWT handling runs:
JwtSecurityTokenHandler.DefaultInboundClaimTypeMap.Clear();
Now claims keep their original names.
Gotcha 2: PEM Keys With Spaces Won’t Parse
When you paste a PEM key into JSON, line breaks often turn into spaces. PEM parsers across every language then throw cryptic errors that don’t point at the real cause.
Two fixes work:
- Use proper \n escapes in your JSON config
- Auto-normalize the key in code
static string NormalizePem(string pem) {
// Strip the header/footer, remove whitespace, re-chunk to 64-char lines
// Full implementation lives in the GitHub repo
}
Node, Python, and Go all hit this exact trap when loading keys from string-based config.
Gotcha 3: Sliding Sessions Can Become Immortal
If your config sets sliding session expiration with a long lifetime like 8 hours, every API call resets the timer. Active users never log out automatically.
The fix puts session control fully in your hands. Make every aspect configurable, then default to a hard cap:
“Session”: {
“MatchJwtExpiry”: false,
“FixedLifetimeMinutes”: 30,
“SlidingExpiration”: false,
“EnforceJwtExpiryOnApiCalls”: true
}
This setup lets you choose explicitly between matching the JWT’s exp, fixing the lifetime to a number of minutes, or sliding on activity.
How Do You Secure the Handoff Endpoint?
A JWT carries only as much security as your validation enforces. Layer multiple defenses, not one.
Validate Every Standard Claim
Reject tokens that fail any of these checks:
- Signature proves OutSystems minted the token
- Issuer (iss) must match your expected OS environment
- Audience (aud) must name your specific app, not a sibling app
- Expiration (exp) must lie in the future
- Algorithm must equal RS256 — never accept none
Add Replay Protection
A valid token still allows replay attacks if someone intercepts it. Track JWT IDs (jti) in a short-lived cache:
if (cache.TryGetValue($”jti:{jti}”, out _))
return Results.Unauthorized();
cache.Set($”jti:{jti}”, true, TimeSpan.FromMinutes(5));
Use Redis in production. In-memory caches lose state on restart and break under load balancers.
Keep Token Lifetimes Short
Tokens valid for 60–120 seconds shrink replay windows to almost nothing. The user only sees the token in the URL for the few hundred milliseconds during the redirect.
[Insert link to OWASP JWT Security Cheat Sheet]

How Does the Frontend Connect?
Our React app never touches the JWT directly. It reads the session cookie that the backend set.
Why Same-Origin Hosting Helps
Build React with “homepage”: “.” in package.json, then have .NET serve the built files from wwwroot/. This setup eliminates CORS entirely. The same idea applies to any backend that serves static files — Node + Express, Python + FastAPI, Go + chi.
How the Auth Context Pattern Works
A single React context calls /api/me on mount and stores the result:
const res = await fetch(‘/api/me’, { credentials: ‘include’ });
if (res.ok) setUser(await res.json());
The credentials: ‘include’ flag matters. Without it, the browser skips the cookie on the request.
[Insert screenshot of the dashboard showing user info loaded from /api/me]
Frequently Asked Questions
Q1.Does the JWT live forever in the browser URL?
No. The browser hits /auth/handoff?token=<JWT> once. The backend immediately validates the token, sets a session cookie, and redirects to a clean URL. The token disappears from the address bar within milliseconds.
Q2. Can the same token authenticate the user multiple times?
The replay protection layer prevents reuse. When the backend validates a token, it stores the jti claim in a cache for 5 minutes. Any second validation with the same jti fails immediately.
Q3. What happens when the OS user’s password changes?
Active sessions in the external app keep working until the cookie expires. New logins from OutSystems require the new password. If you need immediate session revocation, you would add a sign-out propagation step — a topic for a future post.
Q4. Does this pattern support single sign-out?
Not in this minimal version. The pattern handles single sign-on (one login, multiple apps) but not single sign-out (logging out of one logs out of all). Adding sign-out propagation requires a shared revocation channel like Redis pub/sub or a webhook from OutSystems.
Q5. Can I use HS256 instead of RS256?
You can, but you shouldn’t for this use case. HS256 uses a shared secret that both OutSystems and your external app would need. RS256 uses asymmetric keys, so the external app only holds the public half. If your external app gets compromised, the attacker can’t forge new tokens.

Conclusion
JWT authentication in OutSystems unlocks a clean federation pattern. OutSystems owns identity. Your external app owns experience. A short-lived signed token carries the only piece of trust that crosses the boundary. The pattern works with any stack — we used .NET and React, but Node, Python, Java, or Go all fit the same architecture.
The whole proof-of-concept took roughly two days end-to-end. Most of that time went into debugging the three gotchas this post covers. Once you solve those, the architecture stays genuinely simple.
What Should You Do Next?
Start in this order:
- Get JWTUtils working in OutSystems first. Generate a token and paste it into jwt.io to verify the structure
- Build the handoff endpoint in your stack of choice. Turn debug-mode error messages on while you iterate
- Apply the three gotcha fixes upfront so you skip the painful debugging cycle
- Wire up the frontend last. By then your auth flow runs solid
Ready to build it yourself? Clone the full POC from GitHub and run it locally. The repo contains every file, every config example, and every fix this post describes. Drop a comment below if a specific piece — claim mapping, session expiry, or the OutSystems setup — needs more depth, and I’ll reply directly.