
Introduction
While working on an integration project, I encountered a requirement to generate JWT tokens using Elliptic Curve (EC) cryptography and JSON Web Keys (JWK).
At first glance, JWT authentication appeared straightforward. However, after reviewing the requirements, it became clear that the implementation required:
- JWT Authentication
- EC-based Private Keys
- JSON Web Keys (JWK)
- ES256/ES384/ES512 Signature Algorithms
- SHA-256 Payload Validation
Although several JWT solutions already exist within the OutSystems ecosystem, most available options are primarily designed for RSA-based JWT generation and do not provide full support for EC-based JWK signing.
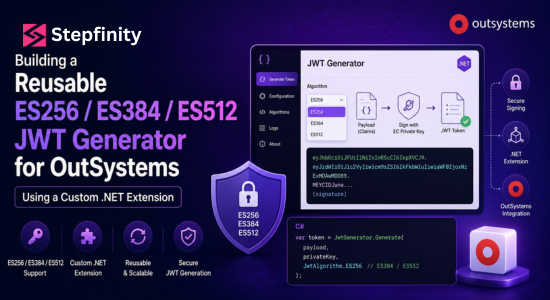
To overcome these limitations, I designed and implemented a reusable custom JWT extension capable of generating ES256, ES384, and ES512 signed tokens using EC private keys.

The Challenge
The integration required JWT tokens to be generated using an EC private key stored in JWK format.
The expected JWT structure contained:
- Standard JWT claims (iss, aud, sub, iat, exp, jti)
- Custom payload integrity validation using a SHA-256 hash
- ES-based digital signatures
A typical workflow required:
- Build request payload.
- Serialize payload to JSON.
- Generate SHA-256 hash of the payload.
- Include the hash as a custom JWT claim.
- Sign the JWT using an EC private key.
- Send the JWT as part of the API request.
While the JWT standard itself is widely supported, support for EC-based JWK signing was not readily available through the existing solutions available in the project.
Evaluating Existing JWT Solutions
Before building a custom solution, I evaluated several JWT-related components and utilities commonly used within OutSystems projects.
Examples included:


- JWT
- JWT Advanced
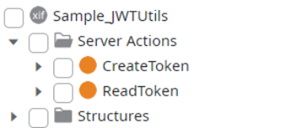
- Sample_JWTUtils
These solutions work well for many authentication scenarios, particularly when using symmetric keys or RSA-based signing.
However, during evaluation it became apparent that support for EC-based JWK signing was either limited or unavailable for the specific requirements of this implementation.
The primary challenge was generating JWT tokens using:
EC Private Key + JWK + ES256/ES384/ES512
which required functionality beyond what was available in the existing solutions.

Technical Limitation Encountered
An existing JWT utility within the project was evaluated as a potential solution.
Although the utility supported JWT generation, testing revealed that it was designed primarily around RSA-based key handling.
When an EC JWK was supplied, token generation failed with errors indicating that the key type was not supported.
This confirmed that the limitation was not related to JWT itself, but rather to the underlying cryptographic implementation.
Building a Custom JWT Extension
Rather than attempting to work around the limitations of the available JWT utilities, a custom OutSystems extension was developed.
The goals were:
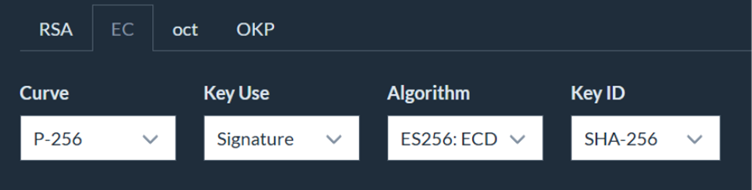
- Support EC-based JWK signing.
- Support ES256, ES384, and ES512 algorithms.
- Support multiple NIST elliptic curves.
- Automatically generate SHA-256 payload hashes.
- Remain reusable across future integrations.
- Provide a simple interface for OutSystems developers.
The resulting extension transformed a project-specific requirement into a reusable authentication component.

Designing the Extension
A new Integration Studio extension was created.
Action:
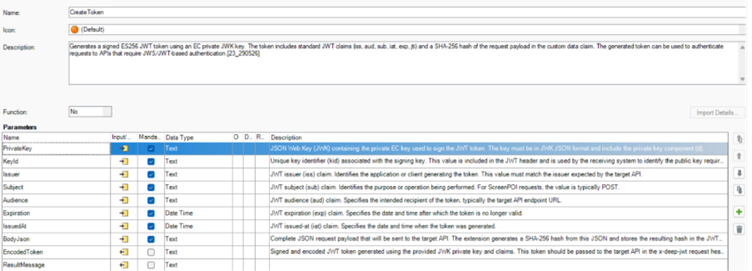
CreateToken – Generates a signed ES256 JWT token using an EC private JWK key. The token includes standard JWT claims (iss, aud, sub, iat, exp, jti) and a SHA-256 hash of the request payload in the custom data claim. The generated token can be used to authenticate requests to APIs that require JWS/JWT-based authentication.
Inputs Parameters: PrivateKey, KeyId, Issuer, Subject, Audience, BodyJson, Expiration, IssuedAt.
Outputs Parameters: EncodedToken, ResultMessage.

How to Use the Custom JWT Extension
The custom extension was designed to be simple for OutSystems developers to consume while hiding the complexity of JWT creation, JWK parsing, elliptic curve handling, and cryptographic signing.
Step 1 – Prepare the Required Values
Before calling the extension, gather the following information:
| Parameter | Description |
| PrivateKey | Full EC private key in JWK JSON format |
| KeyId | Key identifier (kid) from the JWK (optional if present in the JWK) |
| Issuer | JWT issuer claim (iss) |
| Subject | JWT subject claim (sub) |
| Audience | Target system or API URL (aud) |
| BodyJson | Complete JSON payload that will be sent in the request |
| IssuedAt | Current UTC date/time |
| Expiration | Token expiration date/time |
Example JWK:
{
“kty”: “EC”,
“crv”: “P-256”,
“kid”: “example-key”,
“x”: “…”,
“y”: “…”,
“d”: “…”
}

Step 2 – Call the CreateToken Action
Invoke the extension action:
CreateToken
Populate the input parameters with the values prepared in the previous step.
The extension automatically performs the following operations:
- Validates the supplied inputs.
- Parses the JWK.
- Detects the elliptic curve from the crv field.
- Selects the corresponding JWT signing algorithm.
- Generates a SHA-256 hash of the payload.
- Creates JWT claims.
- Signs the token using the private key.
- Returns the encoded JWT.
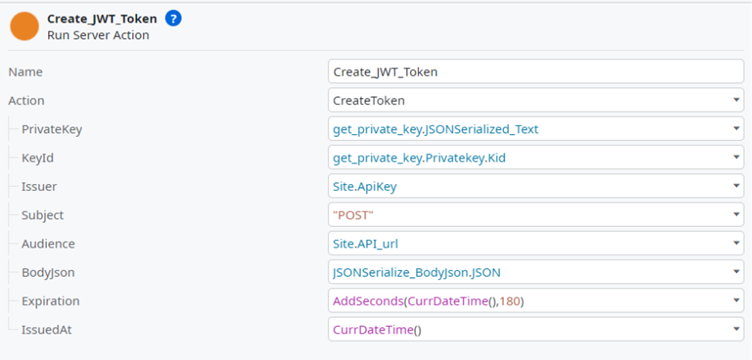
This is the sample code for Create_Token
using System;
using System.Collections;
using System.Collections.Generic;
using System.Data;
using System.Security.Cryptography;
using System.Text;
using Newtonsoft.Json.Linq;
using Microsoft.IdentityModel.JsonWebTokens;
using Microsoft.IdentityModel.Tokens;
using OutSystems.HubEdition.RuntimePlatform;
using OutSystems.RuntimePublic.Db;
namespace OutSystems.NssCustom_JWT_Extension
{
public class CssCustom_JWT_Extension : IssCustom_JWT_Extension
{
public void MssCreateToken(
string ssPrivateKey,
string ssKeyId,
string ssIssuer,
string ssSubject,
string ssAudience,
string ssBodyJson,
DateTime ssExpiration,
DateTime ssIssuedAt,
out string ssEncodedToken,
out string ssResultMessage)
{
ssEncodedToken = “”;
ssResultMessage = “”;
try
{
// Validate mandatory inputs
if (string.IsNullOrWhiteSpace(ssPrivateKey))
throw new Exception(“PrivateKey cannot be empty.”);
if (string.IsNullOrWhiteSpace(ssIssuer))
throw new Exception(“Issuer cannot be empty.”);
if (string.IsNullOrWhiteSpace(ssAudience))
throw new Exception(“Audience cannot be empty.”);
if (string.IsNullOrWhiteSpace(ssBodyJson))
throw new Exception(“BodyJson cannot be empty.”);
// Generate SHA256 hash of request body
string dataHash;
using (var sha256 = SHA256.Create())
{
byte[] hash = sha256.ComputeHash(
new UTF8Encoding(false).GetBytes(ssBodyJson)
);
dataHash = BitConverter
.ToString(hash)
.Replace(“-“, “”)
.ToLowerInvariant();
}
// Parse JWK
var jwk = JObject.Parse(ssPrivateKey);
if (jwk[“d”] == null || jwk[“x”] == null || jwk[“y”] == null)
{
throw new Exception(
“Invalid EC JWK. Required fields: d, x and y.”
);
}
string curveName = jwk[“crv”]?.ToString();
ECCurve curve;
string algorithm;
switch (curveName)
{
case “P-256”:
curve = ECCurve.NamedCurves.nistP256;
algorithm = SecurityAlgorithms.EcdsaSha256;
break;
case “P-384”:
curve = ECCurve.NamedCurves.nistP384;
algorithm = SecurityAlgorithms.EcdsaSha384;
break;
case “P-521”:
curve = ECCurve.NamedCurves.nistP521;
algorithm = SecurityAlgorithms.EcdsaSha512;
break;
default:
throw new Exception(
“Unsupported EC curve: ” + curveName
);
}
byte[] d = Base64UrlEncoder.DecodeBytes(jwk[“d”].ToString());
byte[] x = Base64UrlEncoder.DecodeBytes(jwk[“x”].ToString());
byte[] y = Base64UrlEncoder.DecodeBytes(jwk[“y”].ToString());
// Use kid from JWK if KeyId not supplied
string keyId = ssKeyId;
if (string.IsNullOrWhiteSpace(keyId))
{
keyId = jwk[“kid”]?.ToString();
}
var ecParams = new ECParameters
{
Curve = curve,
D = d,
Q = new ECPoint
{
X = x,
Y = y
}
};
using (var ecdsa = ECDsa.Create(ecParams))
{
var signingKey = new ECDsaSecurityKey(ecdsa)
{
KeyId = keyId
};
var credentials = new SigningCredentials(
signingKey,
algorithm
);
var tokenDescriptor = new SecurityTokenDescriptor
{
Issuer = ssIssuer,
Audience = ssAudience,
IssuedAt = ssIssuedAt,
Expires = ssExpiration,
Claims = new Dictionary<string, object>
{
{ “sub”, ssSubject },
{ “jti”, Guid.NewGuid().ToString() },
{ “data”, dataHash }
},
SigningCredentials = credentials
};
ssEncodedToken = new JsonWebTokenHandler()
.CreateToken(tokenDescriptor);
}
ssResultMessage = “Success”;
}
catch (Exception ex)
{
ssEncodedToken = “”;
ssResultMessage = ex.ToString();
}
}
}
}

Step 3 – Retrieve the Generated Token
After execution, the action returns:
| Output | Description |
| EncodedToken | Signed JWT token ready for use |
| ResultMessage | Success or error information |
Example:
EncodedToken = eyJhbGciOiJFUzI1NiIsImtpZCI6…
ResultMessage = Success

Step 4 – Use the Token
The generated JWT can now be supplied to the target application or API according to its authentication requirements.
A common approach is to include the token in a request header:
Authorization: Bearer <EncodedToken>
or
x-custom-jwt: <EncodedToken>
depending on the implementation requirements.

Step 5 – Verify the Generated Token
For troubleshooting and validation purposes, the generated JWT can be decoded using JWT inspection tools.
The decoded token should contain:
Header
{
“alg”: “ES256”,
“kid”: “…”,
“typ”: “JWT”
}
Payload
{
“iss”: “…”,
“aud”: “…”,
“sub”: “…”,
“jti”: “…”,
“iat”: “…”,
“exp”: “…”,
“data”: “…”
}
The exact algorithm (ES256, ES384, or ES512) depends on the elliptic curve supplied in the JWK.

Supported Curves and Algorithms
The extension automatically detects the curve from the JWK and selects the correct signing algorithm.
| Curve | Algorithm |
| P-256 | ES256 |
| P-384 | ES384 |
| P-521 | ES512 |
No code changes are required when switching between supported curves.

Best Practices
- Store private JWK keys securely and never hardcode them in application logic.
- Use UTC timestamps for IssuedAt and Expiration.
- Pass the actual request JSON into BodyJson, not a pre-generated hash.
- Validate generated tokens during development by decoding them and verifying claims.
- Keep token expiration periods short whenever possible.
- Use the ResultMessage output to simplify troubleshooting and operational support.

Understanding the JWK
The supplied private JWK looked similar to:
{
“kty”: “EC”,
“crv”: “P-256”,
“kid”: “example-key”,
“x”: “…”,
“y”: “…”,
“d”: “…”
}
Important fields:
| Field | Purpose |
| x | Public Key Coordinate |
| y | Public Key Coordinate |
| d | Private Key Component |
| kid | Key Identifier |
| crv | Elliptic Curve |
Without the d value, the token cannot be signed because it represents the private key component.

Extension Responsibilities
The extension performs the following operations:
- Validate inputs.
- Parse the JWK.
- Generate a SHA-256 hash of the request payload.
- Create JWT claims.
- Determine the correct elliptic curve.
- Determine the correct signing algorithm.
- Generate and sign the JWT.
- Return the encoded token.

SHA-256 Payload Validation
The extension automatically generates:
SHA256(BodyJson)
and stores the result inside the JWT as a custom claim:
{
“data”: “<hash>”
}
This allows the receiving system to validate that the payload has not been modified after the token was generated.

Enhancement – Supporting Multiple Elliptic Curves
The first version of the extension was designed specifically around:
Curve: P-256
Algorithm: ES256
Although this satisfied the immediate requirement, it limited future reusability.
The extension was enhanced to dynamically determine both the curve and algorithm directly from the supplied JWK.
Supported Curves:
| Curve | JWT Algorithm |
| P-256 | ES256 |
| P-384 | ES384 |
| P-521 | ES512 |
Example:
{
“crv”: “P-384”
}
Automatically results in:
Algorithm: ES384
Curve: nistP384
Example:
{
“crv”: “P-521”
}
Automatically results in:
Algorithm: ES512
Curve: nistP521
This transformed the solution from a single-purpose implementation into a reusable JWT framework.
Dynamic Curve and Algorithm Selection
Instead of hardcoding:
ECCurve.NamedCurves.nistP256
the extension now reads the crv value directly from the JWK and selects:
- The appropriate elliptic curve
- The corresponding JWT signing algorithm
Supported combinations:
| Curve | Algorithm |
| P-256 | ES256 |
| P-384 | ES384 |
| P-521 | ES512 |
This approach keeps the extension flexible, reusable, and future-proof.
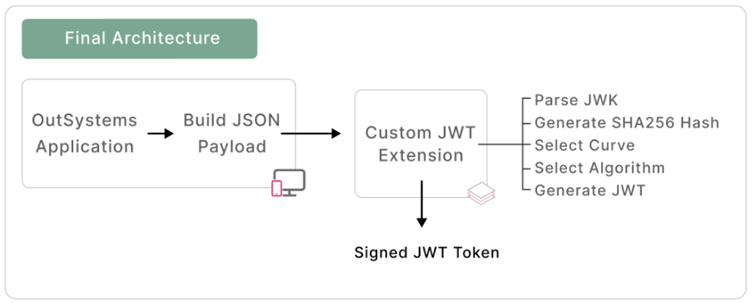

Validation
Generated tokens were decoded and validated to confirm:
JWT Header:
{
“alg”: “ES256”,
“kid”: “…”,
“typ”: “JWT”
}
JWT Claims:
{
“iss”: “…”,
“aud”: “…”,
“sub”: “…”,
“jti”: “…”,
“iat”: “…”,
“exp”: “…”,
“data”: “…”
}
The generated structure matched the expected JWT specification.

Why a Custom Extension Was Necessary
Several JWT solutions already exist within the OutSystems ecosystem and are excellent choices for standard JWT scenarios.
However, the requirement to support:
- EC Private Keys
- JWK Key Format
- ES256 / ES384 / ES512
- Dynamic Curve Selection
introduced requirements that were not fully addressed by the available solutions evaluated during the project.
Rather than modifying existing libraries or introducing complex workarounds, a dedicated extension provided a cleaner and more maintainable solution.
The result is a reusable component capable of supporting modern EC-based JWT authentication standards while remaining simple to use from OutSystems applications.

Benefits of the Final Solution
- Supports EC-based JWK signing.
- Supports ES256, ES384, and ES512.
- Supports multiple elliptic curves.
- Automatically generates SHA-256 payload hashes.
- Provides a reusable JWT framework for OutSystems.
- Simplifies future JWT integrations.
- Eliminates dependency on unsupported cryptographic implementations.
- Maintains compatibility with modern JWT standards.

Lessons Learned
- Understand whether JWT generation occurs on the client or server.
- RSA and EC cryptography are fundamentally different.
- JWK structure is critical when working with EC keys.
- Payload hashing must always match the actual request body.
- Validate generated JWTs early during development.
- Platform limitations sometimes require custom solutions.
- Reusable security components provide long-term value.
- Avoid hardcoding algorithms when they can be derived from metadata.
- Design integrations with future reuse in mind.

Conclusion
What initially appeared to be a simple JWT authentication requirement evolved into a deeper exploration of JWT standards, elliptic curve cryptography, JSON Web Keys, and platform limitations.
By carefully analyzing the requirements and designing a custom OutSystems extension, a reusable JWT framework was created that supports EC-based signing, multiple elliptic curves, and modern ES algorithms.
The final solution not only solved the immediate challenge but also produced a reusable authentication component that can support future integrations requiring ES256, ES384, or ES512 JWT authentication using EC-based JSON Web Keys.